Thursday, 6 November 2014

Using Artists in the Classroom.

It is my personal belief that a rich art education should involve looking at the work of others from a wide range of artists and time periods. Children love looking at other artists work and often find it enjoyable experience to be given time to just appreciate the work of others.

There are Many ways of using artist in the classroom but here are a few that I have found effective in the classroom.

1) Children don't just have to look at art in an art lesson, I have found that using a piece of art work can be a way of starting a discussion in English around a certain topic, a way of generating a word bank around a specific topic. I find that this can work particularly well with special educational needs children as it gives them something from which to start. When talking about autumn with a special educational needs child I used the image below to stimulate conversation around this topic.

                                              Goldsworthy (1978) Oak Leaves and Hole.

2) Allowing children to look at copies of original pieces, not just on the board but physical copies that allow for children to have a close look at the piece of work. To examine how the artist as created the piece, the techniques used and even to take a closer look at the use of tone or colour (Bowden et al, 2013).

3)Visit Galleries !! Nothing will compare to visiting the real thing, children are able to gain an understanding of the artists scale of work as well as make more accurate judgement of what is the artist was looking to communicate (Edwards, J. 2013: Page et al,2006 ).

4) Having artists come into school and work along side children is an invaluable resource. Children can learn so much about their own art practice through working with and alongside an artist, with this idea being supported by the Room 13, 5x5x5= Creativity study, (Adams,2005: Fawcett and Hay, 2004).

These are my own idea for which I have found literature to support them, I have included my sources in my reference list and would highly recommend taking a look if you would like to find out more ideas or suggestion of how to use artists in the primary classroom environment.

Reference List

Adams, J. (2005) ‘Room 13 and the Contemporary Practice of Artist- Learners’, Studies in Art Education, 47(1), pp.23-33.


Bowden, J., Ogier, S. and Gregory, P. (2013) Art and Desin Primary Co-ordinator's Handbook. London: nsead.

Edwards, J. (2013) Teaching Primary Art. Edinburgh: Pearson.


Fawcett, M. and Hay, P. (2004) ‘5x5x5 = Creativity in the Early YearsPrimary Art Education, 23(3), pp. 231-246.

Goldsworthy (1978) Oak Leaves and Hole [Oak leaves] Morning earth [Online] Available at: http://www.morning-earth.org/ARTISTNATURALISTS/AN_Goldsworthy.html (Accessed June 2013).
 
 
Page, T., Herne, S., Paul, D., Charman, H., Atkinson, D. and Adams, J. (2006) ‘Teaching Now with the Living: A Dialogue with Teachers Investigating Contemporary Art Practices’ Primary Art Education, 25(2), pp.219- 230.


Wednesday, 16 July 2014

Illustration


Looking at different illustrators in art fits in well when making important cross curricular links to other subjects and naturally the theme of illustration fits in with literacy. You can look at doing this through two different ways, you could ask your children to create illustrations for a book you are studying in English, or for a piece of their own writing. Another way you could address this is also to look at creating an illustration of a recognisable character in the style of another illustrator. Out of the two I prefer the later task as I think it gives the children more opportunity to be creative as well as allows for a variety in the work produced by the class. I have had a go at making my own illustrations, my first illustration is of Olaf from frozen in the style of Lauren Childs.  


You can see from my images that I have used different materials to create the same style of Lauren childs. I have used wall paper, wrapping paper, paints, pens and pencils. I even Stained my own papers to create some of the colours that I wanted.
 
You could further this activity more by then photo editing the childrens final work. This allows for the children to use their own original pieces of Art work to edit and enhancing the work that they have already created.  Using editing allows for children to experiment with their work as explained by (cox and Watts 2007 p.77). This enables children to experiment with their work without fear that if they try something new and it does not go as planned they have not ruined their work. Allowing children to play with composition, colours and layers having freedom in their work.  (Cox and Watts 2007 p.77) states that how children are able to review and modify their work therefore having a direct effect on the quality of the work produced. This also helps make Art accessible to all children and all will have opportunity to achieve, even children who do not feel confident in their artistic ability can use photography and photo editing software to create a piece of Art. It also allows the children to experiment and see how they could further develop their own work, to reflect on this in their own studies. Being able to reflect and experiment their selves is similar to Vygotsky (1978) and his suggestion that children learn best in their zone of proximal development. In this case the ICT allows for the children to experiment with effects and editing without the aid of the teacher and work independently.


The first image of Princess Jasmine is a simple pencil drawing that has had colour added to it using water colour, the colour are flat and dull and I think the overall look of the image is not of a high quality. The second Image of Princess Jasmine has had the picture sharpened, colour enhanced, and increase of contrast as well as text added. I personally think that the second image is a much higher quality, and in accessible to all schools as the editing was done with Picasa photo editing which can be downloaded for free and is very simple to use. Personally I think with guidance even KS1 should be able to use the software.


Reference List
 
Cox, S. and Robert, W. (2007). Teaching Art and Design 3-11 reaching the standard Series. London: Continuum.
Vygotsky, L.S. (1978). Mind and Society: The Development of higher psychological processes. Cambridge, MA: Harvard University Press.            


Tuesday, 15 July 2014

Paste Resist


Paste resist is a really good way of introducing children to the idea of batik. Paste Resist involves using a simple flour and water paste with the consistency of double cream to outline an image drawn onto fabric.

For paste resist you will need:

·         Plain Flour,
·         White fabric,
·         Brusho Inks in which ever colours you desire.
·         Squeezy bottle for example washing-up liquid bottle or shampoo bottle.
·         Paint brushes


1.       First you will need to mix up a paste of flour and water, the paste  should be of a consistency of double cream. Once you have made up the paste transfer into a bottle such as a washing-up liquid bottle or shampoo bottle which will allow you to squeeze the paste out in a continuous line. This should be done the night before you intend to use as the paste needs to be left overnight.

2.       Children should fist sketch out a design before drawing on fabric once they have done this the children can draw out their design You can either have a piece of fabric for each child or larger pieces of fabric and ask the children to work collaboratively in a group. It is important  to remind the children that their images to be large, this will prevent when applying the paste the paste all running into one blob, this is what can happen if the images that the children are applying the paste too are too small. The children should use pencil when drawing on their design, it is important to remind the children that any mark they make on the fabric cannot be removed.

3.       Once the children have drawn out their design it’s time to go over the outline using the paste, it is important to demonstrate this process to the children showing the children how a little is a lot!! They do not need to use a lot of paste. If the children accidently apply to much paste then they can use a fine paint brush to spread the paste along the lines. Once all the lines are covered the design needs to be left over night or until the paste has dried hard.
 

4.       Once dried the children can then fill in different sections of the design with the Brusho ink. The paste creates a barrier to the fabric leaving the parts covered in the paste white whilst you apply colour to the areas that have no paste. It is a good idea to do this on some plastic dust sheets  and news paper as the area can get very wet!! Again this needs to be left over night to dry.

5.       Once the Ink has dried you can peel off the paste, I find that this is difficult for little hands and using spoons to peel off the paste is much easier. Once you have peeled off your paste you should see your design in the fabric.
 

This activity is great with EYFs and once you have done this activity with the children fully guided I see no reason as to why the children couldn’t do this independently if the activity was set up for them. I have used this activity twice in school the first was with a KS2 class who made pieces around things important to them as a collaborative piece looking at Grayson Perry. I also completes this activity KS1 and EYFS with an under the sea theme to fit in with the childrens topic work, both times they worked brilliant and where a massive success!

With older children you could even work in to the design once you have peeled off the paste with stitching, and different types of applique to make this more of a textiles piece making cross curricular links with Design and technology. If working collaboratively you could look at introducing P.S.H.E and being respectful of others and their work as this is really important to creating a collaborative piece.


Wednesday, 4 June 2014

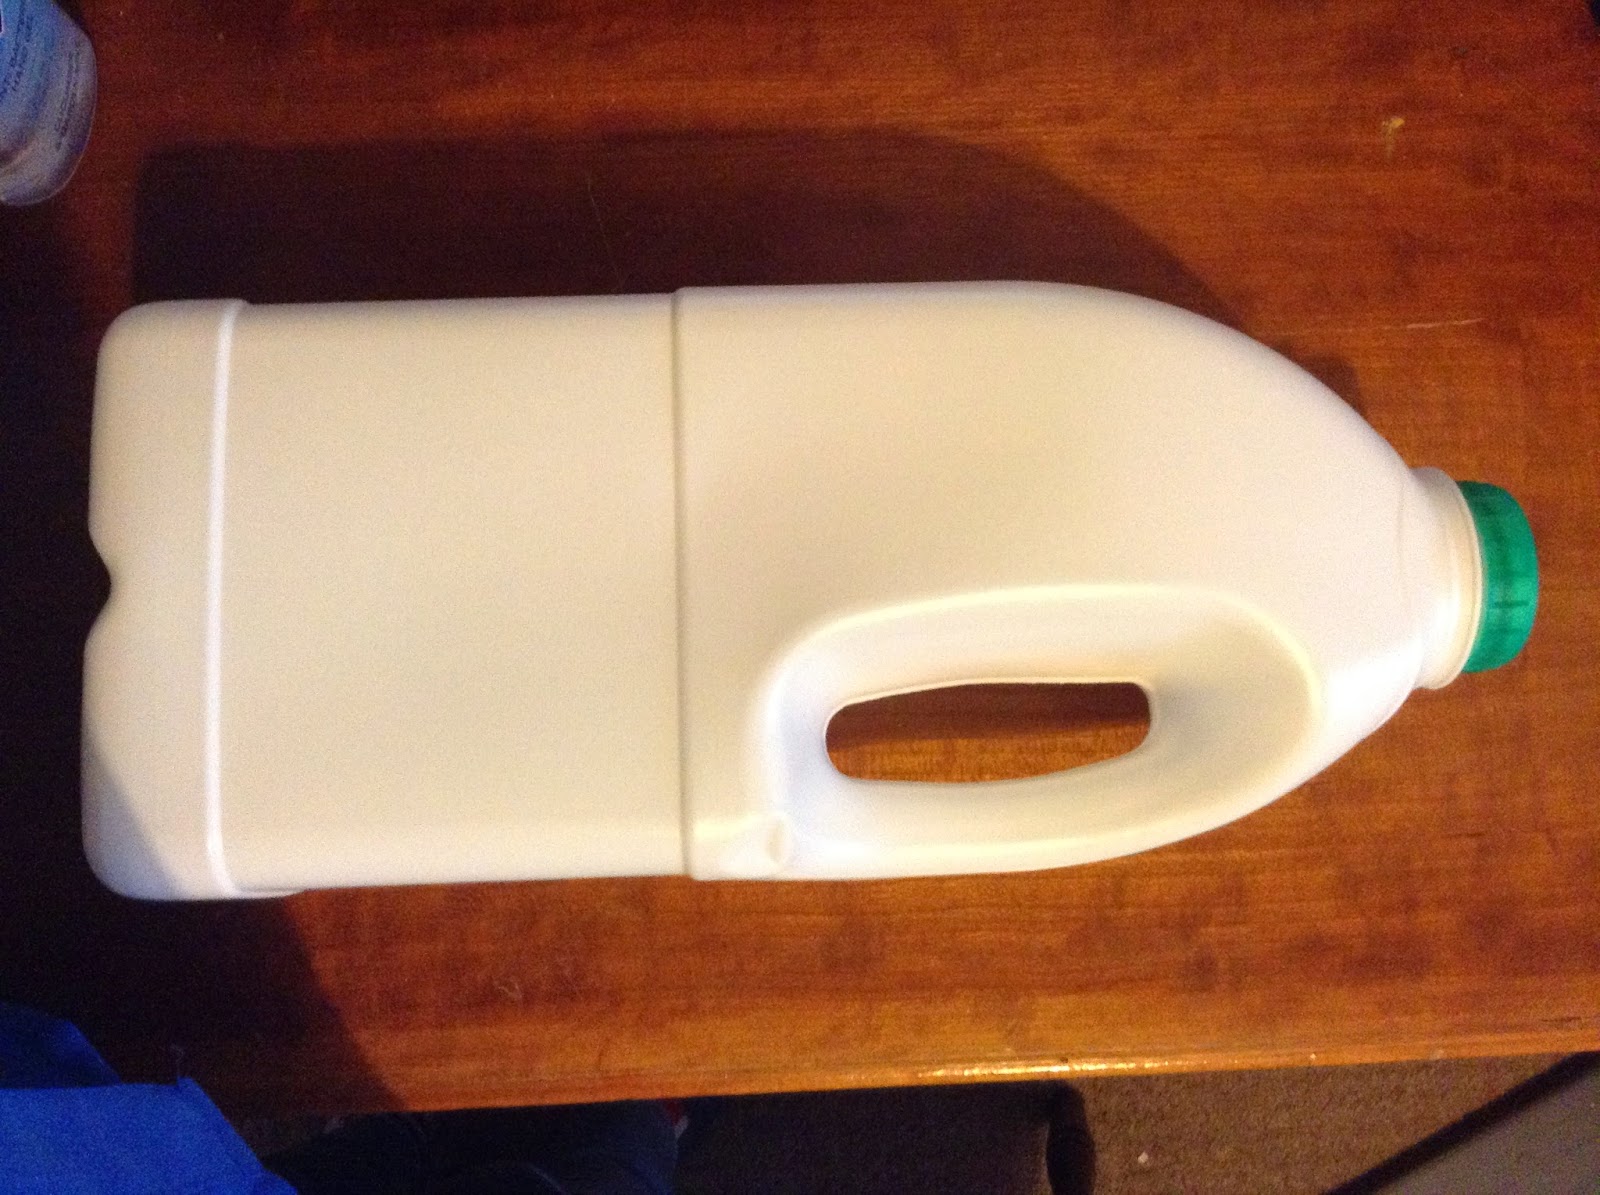
Elmer Milk Bottles with early years classes

This is not my own idea but on a recent practice I saw these made by a reception class and thought they were great so wanted to write a blog about them.

Here is a Step by step guide of how to create your own Elmer the Elephant.

1. Wash out and dry a milk bottle. The size does not matter and it is your decision as to what size you use depending on how large or small you want your Elmer to be.


2. Cut off the top of your milk bottle and from each side of the main part of the bottle cut out semi-circles to create the legs of the elephant, (if doing this activity with young children you may want to pre-prepare this or help the children).


3. Cut out small squares of tissue paper in a variety of rainbow colours and glue them to the bottle using glue.


4. Once Elmer is covered in tissue its time to add eyes. You can either draw, paint of glue googly eyes to your Elmer it up to you!


  Your Elmer is complete!! This activity would work really well with EYFs as if the bottles are prepared in advance the children can complete the task independently!!!

You could also use this as an opportunity to talk to your children about recycling and how we can sometimes reuse items that we might usually throw away.


All Images taken and owned by Melissa Pope.

Saturday, 31 May 2014

Andy Goldsworthy Inspired Art Lesson

Looking at other artists work is important part of art education, children can gain a lot from looking at other artist work. Looking at other artists work can inspire children and even have them try something they may not have considered, this lesson looks at the artists Andy Goldsworthy and Richard long in a lesson inspired by there work. The lesson I have planned is suitable for a Key Stage 1 class but could be adjusted to suit any age group.

Learning objectives
1. I will be able to talk about and name two artists.
2. I will be able to start exploring tone in my observational drawing.

Starter Activity (10 Minutes)-
Introduce to the children the artists Andy Goldsworthy and Richard Long through showing children examples of work created from natural forms.
Ask the children how they think the pieces have been created?
What has the Artist used to create the image?
What do the children think of the composition?

Main Activity - (35 minutes)
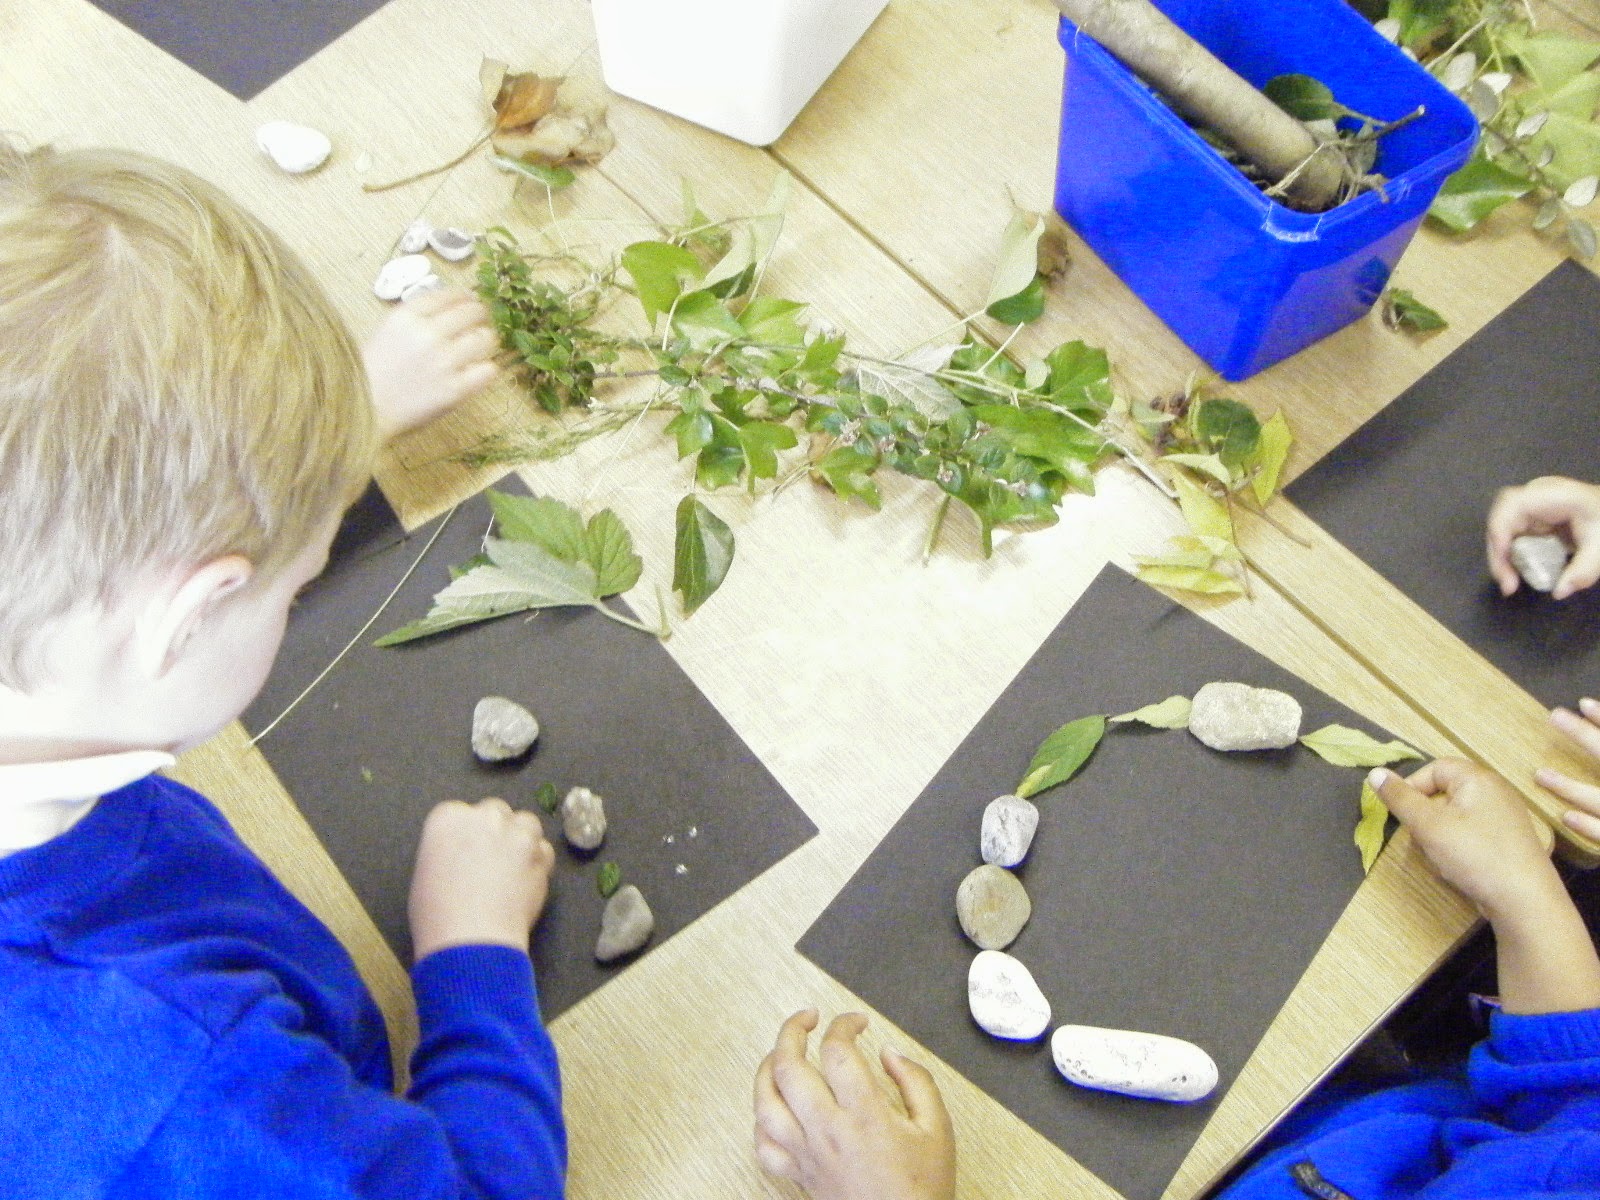
Take the children on a nature walk around the school grounds to collects different natural forms e.g. twigs and leaves give the children about 5 minutes.
Once in the classroom ask the children to create their own image concentrating on composition on a background piece of paper (I found that a black background looked best).
Once the children have finished their image photograph the work but make sure the children all have a name label on their work!!

Image (Sherell 2013)

Once the children have finished their work bring the children back to the carpet and demonstrate how to use different artists pencils looking at the different gradients. You can demonstrate this simply by showing children on a piece of paper that the harder you push the darker the line make and how you can create even darker lines with different gradients. Sending the children back to their work know ask the children to create a detailed observational drawing of their piece of work using the different gradients, children can either draw a small section of their work of the whole piece.
This may take longer than 35 minutes however I feel it is important that the children should have time to finish this work as it looks at two different art forms and using them in away that ALL children should be able to achieve the objectives throughout the session.

Image (Sherell 2013)

Plenary 10 minutes-
Ask children to leave their drawings next to their natural form piece of art work. Know allow the children to walk around the class and look at other childrens work encouraging peer assessment. Once the children have had the chance to look at the work lead the children in a discussion asking what they saw in others work as well as what they liked.

During the plenary don't forget to revisit the learning objectives:
1. I will be able to talk about and name two artists.
2. I will be able to start exploring tone in my observational drawing.

This lesson looks at exploring different mediums that the children may not have looked at before. Although this session was planned for a key stage 1 class I decided it was important for the children to use proper artists pencils with different gradients I believe that to get good results it is important that children should use the correct resources, this also helps the children to take enjoyment in the work through exploring these new materials.

Image (Sherell 2013)

Reference List

Sherell, D. (2013) Environmental art day collection [Photograph].


Sunday, 25 May 2014

What is the Relevance of using contemporary Artists in the primary classroom?


How children respond to the work of artists
Children can gain a lot from working in response to looking at the work of contemporary artists,  and you are often able to find art from artist or of subject matter that ‘Meet the needs of all learners from whatever social and cultural background’, Page et al (2006, p.221).  This can be done in a number of ways:
·         Having an artist of the month, (Key and Stillman 2009, p.100).
·         Being appreciative of others work, (Childs 2000, p.94).
·         Real artists work being brought into the classroom, (Childs 2000, p.94).
Through studying the work of artists and looking at what and they have produced and its meaning children start to develop this in their own work.  This is supported by the room 13 study and seen in the room 13 ZCZ films in which Jodie Fraiser produced a work of art based on the 9/11 bombings out of matchsticks and each stick representing a life lost (Room 13/ ZCZ films).
Visiting galleries
Exposes children to opportunities and experiences that the children cannot have through learning art education in the classroom. Edwards (2013, p.35) talks about how visiting galleries can give children the chance to work with artists, as well as curators who are knowledgeable of the art in there gallery.
Children Working alongside artists
Children working alongside artists as put forward by Raines (1997, p.54), artist encourage creativity, as well as individuality as the children see the artist create their own identity through art. Furthermore children working with artist allows them to see the process of making a piece of art, children are able to see how the artist works and as explained by Grigg (2010, p.222) when artists work they often rework there artwork, this allows the children to see that its ok to make mistakes in art and can often boost a child’s confidence in art education. Not only this but children see the enthusiasm that they have for their work as explained by Sharp and Dust (1997, p.3).Which is something that does not always get through a child’s art education, if the class has a negative feeling towards art then the teachers perception may rub off on to the children. This is why it is important for children to be around artists as they promote a love of art.
Artist teacher/ teachers and artist working in collaboration
The artist teacher or teachers and artists working in collaboration is just one of many approaches to having the contemporary artist introduced into the classroom. When working at the artist teacher of in collaboration with an artist is important to consider:
·         Planning with the artist or as an artist so that pupils acquire necessary skills knowledge and understanding, (sharp and Dust 1997, p.62).
·         For teachers and artists to, ‘understand each other’s perspective and ways of working, they should not find it difficult to develop a joint strategy for working together.’- (Sharp and Dust 1997, p.63).
It is important as a teacher to be creative, they need to know about art, artistic element to be able to plan appropriate activities, (Fox and Schirrmacher 2012, p.272). Which is why the artist teacher or artist in your classroom is a valuable resource as they already have this and can work on expanding the children’s artist knowledge and understanding as well as the skill of art. They are not limited by a lack of subjects knowledge or understanding of contemporary art, (Page et al 2006, p.228) and so enable rather than limit the child’s learning.
In my own practice I have had experience of using contemporary artists in the primary classroom, showing the children images of artists work can have a positive effect on the children’s approaches to art. As explained by Cox and Watts (2007, p.142) through careful selection of work and artists you offer the children the chance to have better understanding of specific aspects of art.
After using Andy Goldsworthy’s work in a lesson the children had a greater understanding of what it was they was required to do as well as drawing ideas from the piece for their own art. This promotes a greater understanding as well as developing the children’s questioning skills in relation to art.


Looking at the research that I completed during January supports the view that there is a place for the contemporary artist in the primary classroom. With the exemption of one child the group rated having real physical artwork at 4/5. This is also supported in what was said by the children in their questionnaires, Child M said, ‘I was able to magpie different things I like from each different mixed media art and place it in my own work’.  These responses show the positive effect of the children being able to communicate not just with the artist but see art in real life, and being able to use this in their own work as explained by child M.
 
 
Conclusions
Contemporary artists have a place in the primary classroom. A problem of art education is as explained by Page et al (2006, p.272) as having a poor Subject knowledge, limitations and a lack of understanding of contemporary art’.  This is why there is a place for the contemporary artist in the classroom; they expose children to new experiences and make art education exciting and current for the children to enrich their education.


Reference list
Childs, J. (2000) Teaching integrated Arts in the Primary school Dance, Drama, Music and the Visual Arts. New York: David Fulton Publishers.
Cox, S. and Robert, W. (2007) Teaching Art and Design 3-11 reaching the standard Series. London: Continuum.
Edwards, J. (2013) Teaching primary art. Edinburgh: Pearson.
Fox, J. and Schirrmacher, R. (2012) Art and Creative Development for Young children. 7th edn. United States: Wadsworth Cenage Learning.
Goldsworthy (1978) Oak Leaves and Holes [Oak leaves] Morning earth [Online] Available at : http://www.morning-earth.org/ARTISTNATURALISTS/AN_Goldsworthy.html (Accessed June 2013).
Pope, M. (2014) Artists in the classroom research collection [Photograph].
Key, P. and Stillman, J. (2009) Teaching Primary Art and Design. Exeter: Learning Matters LTD.
Page, T., Herne, S., Paul, D., Charman, H., Atkinson, D. and Adams,J. (2006) ‘Teaching Now with the Living: A Dialogue with Teachers Investigating Contemporary Art Practices’ Primary Art Education, 25(2), pp.219- 230.     
Raines, I. and Raines, S. (2013) Creativity and the Arts with young children. 3rdend. United States: Wadsworth Cenage Learning.          
Room 13/ZCZ Films for Channel 4. (2004). What Age Can You Start Being an Artist? UK: Channel 4 Television. (First aired: January 2004).

Sharp, C. and Dust, K. (1997) Artists in schools a handbook for teachers and artists. Berkshire: National foundation for educational research.


Hello world!

Hi Everybody!

This is my first blog post about the teaching of Art Education in the primary schools and the discussions of best practice when teaching Art to children.

In this blog I will be sharing with you ideas for lessons that I have come across on my teaching placements, or ideas I have done with children as well as looking at ways of teaching Art. Hopefully together we can create curiosity in children through Art!

Turner contemporary summer 2014