2. To print the first layer of our poly print planning colours and layers for following weeks.
Success Criteria
·
Design and plan poly print thinking about colour and cutting away of
the plate to create layers of colour.
·
Children
use appropriate amount of ink.
·
Roll
consistently
Main activity
First children design and sketch a simple image in the style of Paul Catherall looking back at his work to support this. When happy with image (keep it simple) children need to colour their
image using three colours the back ground colour should be the darkest and
gradually get lighter. Anything on their plate that the children want to keep
white the children need to cut into the poly print sheet so that this not
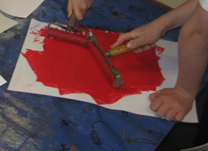
covered by ink during the first print. Ink up the plate using printing ink and
roller. Lay the plate carefully on the
paper, children need to be careful not to mark the page
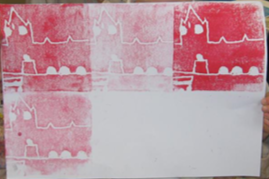
with ink and leave enough room for children to create repeated print. Children
then need to rub over the back of the plate with palm of their hand to create
an image transfer.
(Could
try using clean roller to see which gets best results)
Lift
to reveal image!
Children
will need to carefully clean their plate with water to be able to reuse next week the same
plate.
Resources
Printing
ink
Rollers
Boards
Polly Print
1. Draw around printing plate in sketch book.
2. Next sketch a simple Paul Catherall inspired design. Colour this in using only 3 colours !!!! this is very important.
3.with a sharp pencil sketch your design on your polyblock. Always drag the pencil towards you to create a clean line
4. Roll out your ink on t your ink boards. The ink should be rolled thin enough to be shiny but not matt.
5. Next roll out the ink onto your printing plate.
6. Place your printing block on the paper and use a dry roller to roll over the back of your print to transfer the image. You must use a dry roller !!! When you come to remove your printing plate peel the paper off the plate not the plate off the paper!!!


No comments:
Post a Comment